I usually prefer to play US Army forces (hey, its in my blood guys) so I will often take a NATO or Marine module scenario and change the blue forces. I only allow myself to look at the map and the force make up for the blue forces. I then set up a similar blue force with US Army forces and deploy them in the set up boxes.
For this particular game I used "NATO H2H Dutch Mech Inf Co vs Syrian Inf Co." I replaced the Dutch Mech Co with a US Stryker Company along with like US supporting arty and added two flights of OH-58s, since US forces are very, very rarely going to conduct this type of operation (deliberate attack) without some sort of air support. I then started the game and began my mission analysis/planning (answering my ten questions).
1. What do I have to do? The mission in this scenario sucks. Basically, all I can glean from the briefing is I have to seize a small village and I have 55 min to do it in.
2. What do I know about the terrain?
a. Key Terrain
b. Avenues of approach
c. LOS
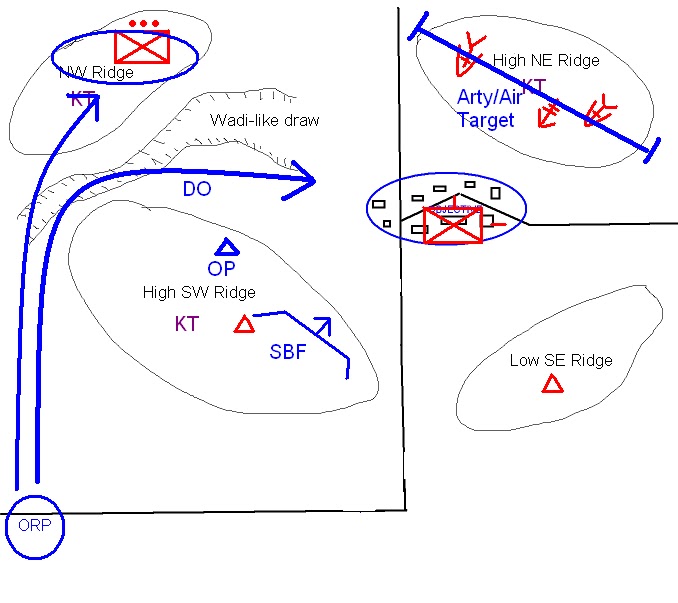
Based on my terrain analysis I draw a sketch on a piece of paper (redrawn here with MSPaint):

3. What do I know about the enemy? Precious little. All the intel I have is a Syrian Infantry Company.
a. Strength/capabilities: 3 rifle platoons with PKMs and RPGs as support weapons. A MTR section for fire support. Perhaps ATGMs and Hvy MGs sliced from BN.
b. Position: I have to make a guesstimate based on the terrain and units available IOT come up with an idea of how the enemy might fight. One platoon overwatching the wadi from the NW ridge, Crew Served Weapons (CSW) on the NE ridge overwatching the village, Observations Posts (OPs) on the southern ridges for security and the remainder of the company in the village proper.

4. What forces do I have at my disposal? Stryker Company with three rifle platoons and a MGS platoon. Arty and light air support.
5. At what point do I begin to win the battle (decisive point)? I believe my decisive point will be gaining entry into the objective area. I have to set the conditions to make that successful and that will include sufficiently suppressing or destroying the outlying units and CSW. Once I do that I will have eliminated a good portion of his combat power, making the seizure of the town a sure thing. So I will focus my combat power, particularly my supporting assets, on suppressing or destroying enemy assets on the NW and NE ridges and in the village before I begin my assault.
6. How can I most take advantage of the enemy's weakness? As in the first tutorial I believe the enemy's weakness is his dispersal. It allows me to defeat him in detail and the terrain is such that I can do it without having to worry too much about the other positions. In other words, his lack of manpower and the terrain keeps him from placing his positions where they are mutually supporting, particularly the NW ridge.
7. Can I deceive the enemy to my intentions in any way? Given my own limited assets I do not believe I can achieve a substantial, beneficial deception this mission.
8. Where do I want to focus my combat power? See 5 above.
9. What tasks do I need to accomplish? Due to lack of intel my first task will be to try to confirm my assumptions about the enemy dispositions. I will do this by establishing an OP on the SW ridge to observe the village and the northern ridges. I will need to suppress/seize the NW ridge. Establish a SBF on the eastern end of the SW ridge. Suppress the NE ridge. Seize the village.
10. Which forces can be assigned to accomplish these tasks?
Sniper: establish OP IOT confirm/deny enemy disposition
Air/Arty: Suppress NW and NE ridges IOT prevent destruction of Decisive Operation (DO)
4 MG teams and MGS platoon: establish SBF position IOT prevent destruction of DO
1 Stryker Platoon: Seize NW ridge IOT allow freedom of movement of DO
1 Stryker Platoon (DO): Establish foothold in village IOT allow passage of follow on platoon
1 Stryker Platoon: Seize village IOT to accomplish higher's purpose
Notice in my task and purpose lay down how all the tasks and purposes support (or are "nested") with the decisive operation (the decisive point task). This ensures Unity of Effort and Mass as well as a few other Principles of War. The exception is the last platoon which is essentially accomplishing the task from higher (seize the village) but which I have decided is not decisive to accomplishing that task.
My hasty plan as drawn on my planning sheet:
I started the OP establishment as a Leaders Recon. This is a standard procedure when a commander is faced with a mission with very little intel. If time permits, he will stealthily move forward to the objective area and try to confirm/deny as much info as possible. He would then return to the Objective Rally Point (ORP, a sort of Patrol Base where the unit makes its last minute preparations before the attack) and disseminate what he had learned and make any changes to the plan that needed to be made. That is why I sent forward the CO with the Sniper Team and FSO (to call for fire). But I realized, particularly after the Sniper Team compromised themselves, that I didnt have time for him to return to the ORP, so I kicked off the attack and he observed/commanded from the OP. The Snipers/FSO could have accomplished the task without the CO needing to go along . If they had made contact at any point in their infiltration, I would have withdrawn them immediately and established the SBF position IOT hopefully achieve the same results.
Video of attack is on my YouTube page: http://www.youtube.com/user/tjcmsf