Wednesday, March 12, 2014

Tutorial 2.0 - Rifle Company conducts night attack on urban area.

Situation:   US forces are attacking north to seize a major city.  Mechanized forces are spearheading the attack along a narrow front.   For this phase of the campaign it is decisive that US forces seize the bridges across a major river that lead into the city.  Intelligence on the area indicates the bridges are probably lightly defended but may be rigged for demolition.  The Corps commander decides on a bold operational maneuver: a turning maneuver utilizing airmobile forces.  Light infantry forces will air assault into the enemy’s rear, seizing key terrain (including the bridges), and force the enemy’s Main Line of Resistance (MLR) to collapse once their rear is threatened.  The mechanized units will then push forward and link up with the air assault force (sound familiar?).

Your Brigade is tasked with seizing pieces of key terrain that lead to the area with the bridges in order to(IOT) allow the rapid advance of relief forces.  Your battalion is tasked with seizing two small towns along Route Texas IOT allow the rapid advance of relief forces.    One company reinforced (the Battalion Decisive Operation) will seize a large town to the north of your objective.  One company (Supporting Effort 2) will secure the BN support area and the supporting artillery battery (105mm) to your east.  Your company (Supporting Effort 1) will seize the town of Al Jabal.  Your rifle company, reinforced with an AT platoon, will air assault into an LZ a few kilometers west of the Al Jabal at night with a few hours of darkness left to seize the town.  Lead elements of advancing forces are expected around 1000 hrs.

Al Jabal is a small crossroads town, consisting of paved streets, relatively widely dispersed buildings (some with two stories), and long straight avenues.  It is believed to be defended by an understrength motorized company, possibly recovering from an earlier battle.  Only a few BTRs have been spotted in the area, most in the vicinity of the School.  The town will not receive a lot of attention from air assets prior to the air assault in order to deceive the enemy to its level of importance.  There are four key structures within the town that will need to be seized: The Hotel, School, Police Station and Government Building.  Civilian presence south of the major river is very sparse due to refugee evacuations north. 

MissionA Company/1-502nd PIR seizes Objective Al Jabal NLT 230500JUL10 IOT allow the rapid advance of friendly forces.

Execution:  Advance from west to east toward OBJ Al Jabal.  Seize key structures in sequence.  Try to preserve all structures as much as possible but quick and efficient seizure of objective is the priority.  105mm fires are available.

Al Jabal (view from the North):


Friendly Forces (from the Southeast): One Rifle Company with three rifle platoons and a HQ element plus an AT platoon


Ok, so you just started the scenario, read the mission brief, looked at the map and your forces.  Now what?  If you are an actual Army officer you apply one of two planning processes: Troop Leading Procedures or the Military Decision Making Process.  TLPs are mostly for company and below, MDMP for battalion and above.  As a planning template they can go from ridiculously easy to mind crushingly complex.  It really all depends on the time available and the anal-retentiveness of your boss.   What I am aiming for here is a simplified process for CMSF players to pull out and apply anytime they find themselves in this situation in front of their computer.  I hope to keep it to a simple list of questions, so here it goes.

1.      What do I have to do?
2.      What do I know about the terrain?
a.      Key terrain
b.      Avenues of approach
c.      LOS
3.      What do I know about the enemy?
a.      Strength/capabilities
b.      Position
4.      What forces do I have at my disposal?
5.      At what point do I begin to win the battle (decisive point)?
6.      How can I most take advantage of the enemy’s weakness?
7.      Can I deceive the enemy to my intentions in any way?
8.      Where do I want to focus my combat power?
9.      What tasks do I need to accomplish?
10.   Which forces can be assigned to accomplish these tasks?

By the time you answer these ten basic (but not so simple) questions you will pretty much have formulated your plan.  All you need to do then is make some notes or draw some graphics to keep yourself on track and roll on out.  Here’s how:

Question 1:  What do I have to do?
This is simply a review and understanding of your mission statement.  I realize that a lot of CMSF mission statements may not be that well written but we have to take what we can get.  A mission statement should include who, what (Task), where, when, and why (Purpose).  For our purposes, who, where, and when are pretty obvious (you, the scenario map, and now).  So that leaves us with Task and Purpose.  And these are the really important pieces anyway. 
My commander can call me on the radio and tell me to go to such and such a grid by a certain time and I can do that.  But I am not going to know what to do when I get there without a Task.  The Task defines what I need to do; the Purpose will often add depth to the Task and give me a better understanding of my commander’s intent and how success is defined.  Worst case, given an emergency situation, a commander should be able to give a verbal order to a subordinate consisting of nothing more than a standard mission statement and the subordinate will have all the info they need to carry out the task.

Common tasks associated with offensive operations:
               Destroy                               Clear
               Isolate                                 Occupy
               Assault                                Secure
               Attack-by-fire                     Seize
               Breach                                Suppress

Common purposes associated with offensive operations:
               Enable                                 Open                                   Allow
               Deceive                               Envelop                               Create
               Deny                                    Cause                                  Support
               Prevent                                Protect

Our mission statement for this tutorial:  A Company/1-502nd PIR seizes Objective Al Jabal NLT 230500JUL10 IOT allow the rapid advance of friendly forces.

Our Task: Seize
Our Purpose: allow rapid advance of friendly forces.

Seize is usually defined as taking and holding ground that is currently occupied by the enemy.  Our purpose indicates we need to ensure that the main route through the town is free of enemy fire and obstructions.   Objective Al Jabal encompasses the entire town so that makes defining success rather easy.  But if the town itself was larger than it would be more difficult to define.  We would have to make a determination of what parts of the town we needed to seize/secure IOT prevent the enemy from interdicting our relief forces.  That is an example of how closely the task and purpose can be interrelated.  That is also a good example of what the Army calls “Implied Tasks” but I will get into those in another tutorial.

So our answer to Question 1: attack and seize the town of Al Jabal (as defined by the scenario objectives) by game’s end.  That’s pretty easy to understand and straight forward.


Tuesday, March 11, 2014

Tutorial 2.1 - Rifle Company conducts night attack on urban area(cont).


Question 2: What do I know about the terrain?
A thorough understanding of the terrain is essential to your evaluation of the enemy situation and developing your course of action.  When it comes to shooting guns and moving multi ton vehicles around you have to become very familiar with the rolls of the terrain, the slope of those hills, vegetation thickness and the trafficability of the ground.  Luckily each player can take advantage of a full scale 3D mock up of the terrain while conducting planning (the setup screen).  I have narrowed terrain analysis down to three categories that I think will help the CMSF player make a quick yet beneficial assessment.

               Key Terrain.  This is terrain that in some way affects maneuver, fires, or gives a distinct advantage to one side or both.  Bridges, tall buildings, marshes, and prominent hills are good examples.

               Avenues of Approach.  These are routes through the objective area that can be categorized by speed and size.  The most favorable of those with the addition of cover and concealment in relation to the enemy’s likely positions will provide you with your maneuver corridors.

               Line of Sight.  This defines what ground the enemy can cover by fire, what routes you can use without being hindered by the enemy, and what positions you can use to maximize the effects of your fires on the enemy.

Terrain analysis for our scenario:

Key Terrain circled in purple.  Basically for this map it’s simply the buildings that offer a height advantage to the terrain around them.


In urban environments we will often create sectors of the area to help in command and control.  This will also help in creating a sequential assault plan based on the pieces of key terrain.  More on how to use this later.
Key terrain with sector overlay:


Avenues of Approach

Skipping ahead slightly, I already know that my Decisive Point will most likely be establishing a foothold in the town.  This is based on training and experience with this type of attack, not an assessment of this particular enemy or terrain.  Once inside the town the actual clearing of it becomes a rather simple process of fire and maneuver.  So establishing a foothold is the point where I feel I will win or lose the battle.  I don’t doubt that I can gain one; the challenge will be in keeping my casualties to a minimum so that I can carry on the attack.  Crossing the relatively open ground from my attack positions to the foothold building can potentially be a very costly maneuver.  I have assessed AOAs to support this overall theme.  AOA 1 and 3 are obvious routes into the town because the streets stick out from the main urban area and would be easy to establish a foothold in and then work into the town house by house.  AOA 2 presents a different route but may be harder to break into since it is tied in tightly with the main urban area, giving the enemy a lot of options for firing positions and makes reinforcing that area quick and easy.  It does, however, present another “point” onto which I can easily mass fires and isolate.


AOA 1


AOA 2


AOA 3


Line of Sight.  This is probably the most important aspect of the terrain analysis and will really drive the rest of the planning.  First, study the terrain from the enemy’s perspective.  In the illustration below I have drawn in how the pieces of key terrain can affect the three different AOA that we have identified.


As you can see AOA 1 is covered by no less than five dominant key terrain positions, making it the worst to advance along.  In addition three of those are fairly deep into the town, making them extremely hard to suppress.  AOA 3 is covered by three positions only one of which is really safe from suppressive fires outside the town.  AOA 2 is also covered by three positions but they are all located where they can be effectively suppressed from outside the town.

So now we have the essentials of terrain analysis for this map.  Most of the actual maneuver in this scenario will be from treeline to house and then house to house.  In other tutorials we will cover analyzing terrain for more open maneuver.  

Monday, March 10, 2014

Tutorial 2.2 - Rifle Company conducts night attack on urban area(cont).

Question 3: What do I know about the enemy?

The answer to this question will always be a mix of known facts, assumptions and application of enemy templates.  You have to take the three and try to determine how the enemy will fight given the terrain, his strength and his own mission (as interpreted by you).  For this scenario we can put this picture together:

Facts:    1. Under strength Motorized Rifle Company with combat losses.  Usually 3 rifle platoons with 2 squads and AT section each plus a machine gun platoon, equipped with BTRs.  I could get into the indicators that satellite imagery, over-flight recon, etc would pick up and give the S2 boys that sort of picture but I won’t.  Maybe later or in the Forum if anyone is interested.
2. Only a few BTRs seen on the Objective.
3. The MRC is most likely in a stand down mode with no real defense mission assigned.

Assumptions:    1. The “under strength” piece means the loss of one platoon or its equivalent.   MRC platoons are smaller than US platoons so I am looking at attacking with a 2 to 1 advantage.  Not ideal, particularly in an urban environment but doable against poorly trained, low morale troops.
                2. A nearby armored counterattack force does not exist or will be destroyed by coalition air as soon as it starts moving.
                3. Enemy commander will have adopted a rather laid back, “safe” posture and will not have fortified or placed obstacles designed to fight from the town.
                4. The objective buildings will most likely be occupied by enemy forces since they are the most logical to house troops without displacing civilians, even though most have fled north.  These buildings are also all key terrain with the exception of the police station.  (This is just a rationalization for the objective buildings being marked as such in the scenario.)

Enemy Template:  This is a template designed by intelligence sources to describe and usually graphically illustrate how a particular enemy will fight based on past experience, their own FMs and training and their equipment capabilities.  Since most opponents you will face in CMSF, including the AI, will in no way stick to a template of a military organization anywhere in the world, you can just throw this helpful tool out the window.

Given all of that, I think this is what the enemy will look like.  


Very little outside security, if any, due to lax posture.  The squads are templated in the areas I expect them to be, not in the specific buildings.  For example, I don’t expect a squad and a HQ in the actual hotel, but most likely in it or in the immediate area.  Normally to make such an enemy sitemp (situation template, as this is called) complete you would have to assign a task and purpose to each enemy unit which would help solidify your idea of what the enemy is going to do.  Since this enemy has no clear mission and will simply be reacting once we make contact with them, we cannot assign a task and purpose.  I can however assume that the commander will push his BTRs to reinforce whatever unit is under attack, though this may take some time.  Once he discovers he is under attack by a superior force, he will most likely attempt to consolidate his forces at the Government Building and either hold on for as long as possible or withdraw north.

Now a little theory.  You may be asking yourself why all of this is necessary.  Why not just formulate a quick plan and go with it?  We can change it up as we need to once we make contact with the enemy, right?  No plan survives enemy contact, blah, blah, blah.  Study Napoleon, Sun Tzu or any of the other giants of military thought and you will discover a common theme.  YOU HAVE TO KNOW YOUR ENEMY.  OK got it, why?  Because understanding your enemy and knowing how he fights and developing a plan based on that knowledge is what separates the real warfighters from the amateurs.  Once you understand how an enemy fights you get a feeling for his systems and and techniques.  This is called his decision cycle.  Plan, action, event, assess, reaction, plan, action…  You get the picture.  With that knowledge you can formulate an idea of what he will do given any situation.  You can then break his decision cycle, which will hopefully throw his plan and ability to carry out his plan into disarray.  From that point on he is reacting to YOU, not fighting his plan.  Now that is most easily seen at the strategic and operational level.  How do I apply that to the tactical level?  Well that’s what the rest of our questions are about.

Sunday, March 9, 2014

Tutorial 2.3 - Rifle Company conducts night attack on urban area(cont).

Question 4: What forces do I have at my disposal?
This is a lot more than just a list of the units and vehicles you have available.  It includes an inventory of crew served weapons (MGs, AT wpns, etc), Artillery and Air assets, and strengths and weaknesses of your armor assets.  All of this information will then get placed into a Task Organization.  The key word in this phrase isn’t “organization,” as one might think, but “task.”  Task is what drives the allocation of forces.  For example, you don’t want to assign a platoon a simple blocking position that a squad can handle.  Assign a squad and free the rest of the platoon up to be assigned a different task or as reinforcements for another.

In this scenario:

Three rifles platoons (each with 3 rifle squads, 2 M240s, a javelin, and a HQ), an AT platoon (5 HMMWVs armed with 2 TOWs, a M2, a M19, and M240), a sniper tm, a FO, and a Co HQ.
CSWs include 6 M240s and 3 Javelins

Support assets include 105mm Howitzers and a 60mm Mortar section.  Both with the capability to fire smoke and HE missions.

Our AT platoon, while very powerful in the amount of firepower they can put out, is very vulnerable to RPG and up due to very thin armor.

Final breakdown:

Given this information, once I have a task list made I can begin assigning tasks to each HQ and then assign subunits for them to control.  The C2 rules in CMSF can make this a challenge though it is not that applicable to US/NATO forces since they are rarely out of comms with their HQ in game terms.

5.  At what point do I begin to win the battle (decisive point)?

This is a question that can be answered and defined a hundred million ways and is extremely subjective.  The key is understanding that it is this question that really drives everything else in your plan.  Basically the decisive point is that point in the battle where you think you will have reached a DECISIVE advantage over your enemy.  In a lot of cases this will be nothing more than the point where you have eliminated all enemy resistance on the objective.  If you deem that is the case, than the answer is pretty simple and you can move forward with your planning.  Sometimes, however it is a little less obvious.  

For this scenario:

My final objective is seizing the four buildings in the town marked as valuable.  Decisive to the operation could be the seizing of all four buildings.  Yes, once I have done that I have definitely won the battle.  But is there something I need to achieve prior to that?  Something that if I FAIL to do, it will make my mission extremely difficult or impossible to achieve?  I would argue that if I fail to achieve a foothold in the town without taking significant casualties, I will most likely be unable to clear the rest of the town and seize all the objective buildings.  I could go with the final four as my decisive point, assuming that I have to do all of this other stuff to seize the buildings anyway.  But that would ignore the real value of determining the decisive point.  The decisive point helps me determine where I need to focus my combat power.  Everything I do prior to the decisive point needs to be focused on achieving the decisive point.  Everything after that flows from that point.  I will designate establishing a foot hold with minimal casualties as my decisive point .

6.  How can I most take advantage of the enemy’s weakness?

This questions plays to the point about the enemy’s decision cycle that I brought up earlier.  His weakness may or may not be related to the decisive point or even to your objective.  But by somehow exploiting or attacking it you can create a lot of “friction” for your opponent, swinging the battle in your favor.
I assess my opponent’s weakness in this fight to be his dispersal.  By having to defend four buildings with limit resources he is spread pretty thin, with little or no reserve or counterattack force.  So one of my tasks will be to maximize that weakness by doing my best to pin down his individual assets and destroy his units piecemeal.

7.  Can I deceive the enemy to my intentions in any way?

This is a component of battle as old as time.  If you can get your enemy to think you are doing one thing and actually do something else than the element of surprise can be decisive in its self.  I will most likely conduct a preliminary limited attack on the town from a direction other than my main attack.  This will accomplish two things: (1) it will deceive the enemy to the location of my main attack, hopefully causing him to commit his BTRs early and (2) it will pin down his forces in the sector that I attack.

8.  Where do I want to focus my combat power?

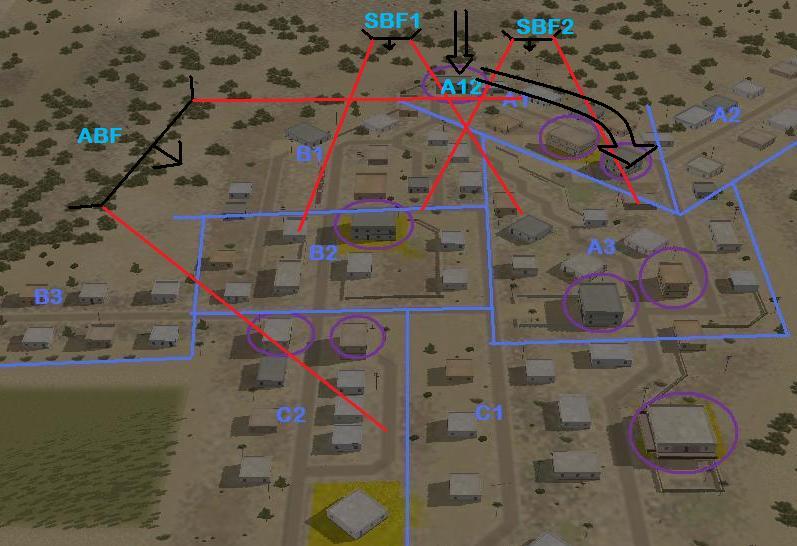
We already know we want to focus our combat power at the decisive point from a theoretical standpoint.  What about on the actual battlefield?  Now we go back to the terrain and enemy analysis and come up with a course of action.  I know that AOA 2 is preferable because I can easily isolate the initial buildings from reinforcement or withdrawal.  I can also suppress the majority of the key terrain that can influence AOA 2.  I can get fairly close to the outer two story building (labeled A12) utilizing cover and concealment.  


By establishing Support by Fire positions outside the town on the left and right flanks of building A12 I can efficiently suppress and isolate it by fire.  Once I have a foothold and a base of fire established in A12 I can isolate buildings A13-A17 and seize them sequentially from the treeline.  With that side of the block secure I can then assault across the street (once I have the suppression and isolation conditions set) and seize A18 and A19.  These two buildings will then serve as the fulcrum as I swing northeast and seize the govt building, the police station and the school in that order.  I elect to save the school for last because it will serve as my deception/pinning objective.  I will initially open the attack by having my AT platoon conduct an attack by fire on the school in order to pin down enemy forces and hopefully destroy the BTRs reported there.  Once I move my forces north of A18 I will have to shift fires to the east of the school to prevent any fires from the ABF position interfering with my own forces moving north and east.  (This, of course, is not a real concern in CMSF but its best to keep in mind and play it real.)  Answer to Q number 8: Focus combat power on sector A1 IOT gain foothold and advance deeper into town, with a secondary focus on sectors B1 and B2 to deceive and suppress enemy forces.

Saturday, March 8, 2014

Tutorial 2.4 - Rifle Company conducts night attack on urban area(cont).

9.  What tasks do I need to accomplish?

Now that I have a basic outline of a plan I can begin to organize a task list.
Maneuver Tasks:
1.       Establish Attack by Fire position IOT deceive/suppress sector B1/B2
2.       Establish 2 Support by Fire positions near building A12 IOT suppress/isolate building
3.       Seize building A12
4.       Establish SBF position in A12
5.       Seize Sector A1
6.       Establish SBF positions in A18 and A19
7.       Seize Sector A3
8.       Establish SBF positions on key terrain buildings in A3
9.       Seize Sector C1 (Govt Building)
10.   Establish SBF position in Govt Building in C1
11.   Seize Sector C2 (Police Station)
12.   Establish SBF positions on key terrain buildings in C2
13.   Seize Sector B2 (Hotel)
Fire Support Tasks:
1.       Establish smoke screen east of sector A1 and B1 IOT deny enemy observation/fires west
2.       Provide mortar fires 150m west of building A12 IOT deny withdrawal/reinforcement of A12
3.       Suppress each Sector ahead of friendly movement
Obviously I developed this list chronologically which is usually the most intuitive method.  Below are the graphics which illustrate the tasks.

Phase 1

Phase 2

Phase 3

Phase 4

Phase 5

Pay particular attention to the left and right limits of the SBF positions.  As the assaulting friendly unit advances from building to building these would shift right or left to keep their fires focused on the ground yet to be cleared, yet pose no threat to the friendly unit.  At some point this would require that certain SBF positions cease fire altogether.

10.  Which forces can be assigned to accomplish these tasks?

Now we refer back to our organization chart and marry that to our task list.


The ABF position is easy.  The AT platoon is the best asset to accomplish this task and it keeps them from having to enter the town where they become especially vulnerable.  The SBF positions will be predominantly manned by the 6 M240s and 3 Javelins under the command of the XO, supplemented by the assault platoons that are not currently leading the formation.  (CMSF C2 mechanics make this another arbitrary detail but it is how things might be handled RL.) Each of the three platoons will remain pure under their perspective platoon leaders.  1st Platoon will seize Sector A1.  2nd Platoon will seize A3 (Hotel).  3rd Platoon will seize C1 (Govt Building).  2nd Platoon will pass through 3rd and seize C2 (Police Station).  1st Platoon will seize B1 (School) from A1.  This gives 1st Platoon time to recover from the potentially most casualty producing phase (est. foothold) and gives them the follow-up mission of attacking the sector that will most likely be the greatest reduced by the time of their assault.
So we have answered our 10 questions, developed a plan and drawn some flashy, pretty graphics to illustrate the plan.  Now we are ready to execute.  Once you get this process down you can do it in a matter of minutes and draw a rough sketch of your plan on a piece of notebook paper.  This will help you keep track of your progression through the plan and give you an instant reference for necessary changes when things fall apart.  But the key take away from all this is that you will have a task for each of your elements and they will all be working in conjunction toward a common goal.   No more floundering around on the battlefield hoping the current hail mary assault will work better than the last!

Videos are on Youtube. Long 45 min movie of attack on town divided into three smaller movies. Be sure to watch them in sequence. Sorry, no sound. Will do better next time, still learning the program. I did however, throw in some captions to try to help you keep up with the action. Enjoy.

http://www.youtube.com/user/tjcmsf?f.../0/iLBBtGL6XY8

Friday, March 7, 2014

Tutorial 3.0 Stryker Company in the Attack

I played a quick game the other morning and on a whim turned on the camera.  As it turned out the mission illustrated a lot of the fire and manuever principles a few of you were asking about in the forum.  So I cleaned it up and posted it on youtube, supported with the following notes.

I usually prefer to play US Army forces (hey, its in my blood guys) so I will often take a NATO or Marine module scenario and change the blue forces.  I only allow myself to look at the map and the force make up for the blue forces.  I then set up a similar blue force with US Army forces and deploy them in the set up boxes.

For this particular game I used "NATO H2H Dutch Mech Inf Co vs Syrian Inf Co."  I replaced the Dutch Mech Co with a US Stryker Company along with like US supporting arty and added two flights of OH-58s, since US forces are very, very rarely going to conduct this type of operation (deliberate attack) without some sort of air support.  I then started the game and began my mission analysis/planning (answering my ten questions).

1. What do I have to do?  The mission in this scenario sucks.  Basically, all I can glean from the briefing is I have to seize a small village and I have 55 min to do it in.
2. What do I know about the terrain?
           a. Key Terrain
           b. Avenues of approach
           c. LOS

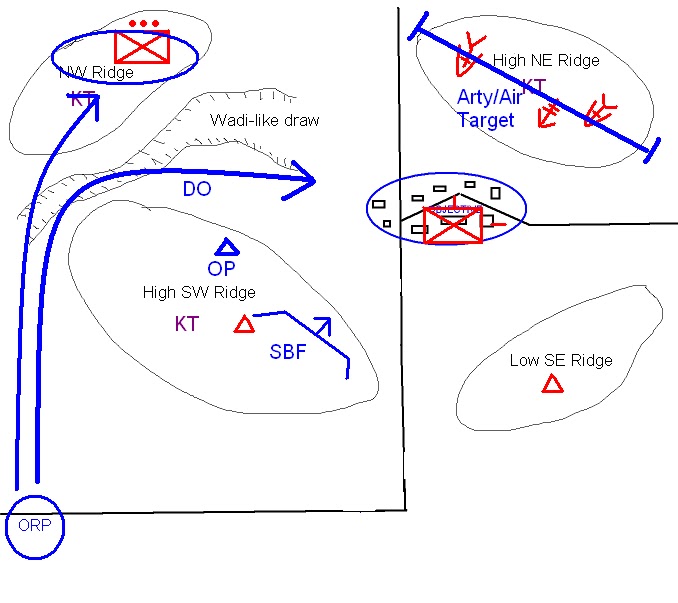
Based on my terrain analysis I draw a sketch on a piece of paper (redrawn here with MSPaint):


3. What do I know about the enemy?  Precious little.  All the intel I have is a Syrian Infantry Company.
            a.  Strength/capabilities:  3 rifle platoons with PKMs and RPGs as support weapons.  A MTR section for fire support.  Perhaps ATGMs and Hvy MGs sliced from BN.
            b.  Position:  I have to make a guesstimate based on the terrain and units available IOT come up with an idea of how the enemy might fight.  One platoon overwatching the wadi from the NW ridge, Crew Served Weapons (CSW) on the NE ridge overwatching the village, Observations Posts (OPs) on the southern ridges for security and the remainder of the company in the village proper.


4. What forces do I have at my disposal?  Stryker Company with three rifle platoons and a MGS platoon.  Arty and light air support.
5. At what point do I begin to win the battle (decisive point)?  I believe my decisive point will be gaining entry into the objective area.  I have to set the conditions to make that successful and that will include sufficiently suppressing or destroying the outlying units and CSW.  Once I do that I will have eliminated a good portion of his combat power, making the seizure of the town a sure thing.  So I will focus my combat power, particularly my supporting assets, on suppressing or destroying enemy assets on the NW and NE ridges and in the village before I begin my assault.
6. How can I most take advantage of the enemy's weakness?  As in the first tutorial I believe the enemy's weakness is his dispersal.  It allows me to defeat him in detail and the terrain is such that I can do it without having to worry too much about the other positions.  In other words, his lack of manpower and the terrain keeps him from placing his positions where they are mutually supporting, particularly the NW ridge.
7. Can I deceive the enemy to my intentions in any way?  Given my own limited assets I do not believe I can achieve a substantial, beneficial deception this mission.
8. Where do I want to focus my combat power?  See 5 above.
9. What tasks do I need to accomplish?  Due to lack of intel my first task will be to try to confirm my assumptions about the enemy dispositions.  I will do this by establishing an OP on the SW ridge to observe the village and the northern ridges.  I will need to suppress/seize the NW ridge.  Establish a SBF on the eastern end of the SW ridge.  Suppress the NE ridge.  Seize the village.
10. Which forces can be assigned to accomplish these tasks?
     Sniper: establish OP IOT confirm/deny enemy disposition
     Air/Arty: Suppress NW and NE ridges IOT prevent destruction of Decisive Operation (DO)
     4 MG teams and MGS platoon: establish SBF position IOT prevent destruction of DO
     1 Stryker Platoon: Seize NW ridge IOT allow freedom of movement of DO
     1 Stryker Platoon (DO): Establish foothold in village IOT allow passage of follow on platoon
     1 Stryker Platoon: Seize village IOT to accomplish higher's purpose

Notice in my task and purpose lay down how all the tasks and purposes support (or are "nested") with the decisive operation (the decisive point task).  This ensures Unity of Effort and Mass as well as a few other Principles of  War.  The exception is the last platoon which is essentially accomplishing the task from higher (seize the village) but which I have decided is not decisive to accomplishing that task.

My hasty plan as drawn on my planning sheet:

A word on the video.  I played the game with no intention of making it into a tutorial just wanted to play a quick game Saturday morning.  But I had the camera rolling and it went well, so I kept it and turned it into a tutorial.  I did follow the planning process above and used the above plan.  The video points out a couple mistakes on my part and a quick, risky adjustment I had to implement on the fly.  But I think it does a very good job of illustrating how to develop a good plan that works, the complexity of keeping up with everything at once on the battlefield, and the need to be quick and decisive when faced with a changing situation.

I started the OP establishment as a Leaders Recon.  This is a standard procedure when a commander is faced with a mission with very little intel.  If time permits, he will stealthily move forward to the objective area and try to confirm/deny as much info as possible.  He would then return to the Objective Rally Point (ORP, a sort of Patrol Base where the unit makes its last minute preparations before the attack) and disseminate what he had learned and make any changes to the plan that needed to be made.  That is why I sent forward the CO with the Sniper Team and FSO (to call for fire).  But I realized, particularly after the Sniper Team compromised themselves, that I didnt have time for him to return to the ORP, so I kicked off the attack and he observed/commanded from the OP.  The Snipers/FSO could have accomplished the task without the CO needing to go along .  If they had made contact at any point in their infiltration, I would have withdrawn them immediately and established the SBF position IOT hopefully achieve the same results.

Video of attack is on my YouTube page: http://www.youtube.com/user/tjcmsf


Thursday, March 6, 2014

Tutorial 4.0 British Module “Cain and Abel,” Movement to contact with march objectives.

This module was brought to my attention in the forums and I decided to take a stab at it, even though I don’t necessarily like playing countries other than the US.  Most western countries have spent centuries studying warfare from a very formal, educated, philosophical standpoint all their own (most eastern countries, though they have millennia of military philosophy, are relatively new to developing a doctrine of their own).  And it takes years of being immersed in that doctrinal system to really understand what lies behind the decision to carry a certain assault rifle, tracked vehicles vs. wheeled, how they balance the armored tripod of speed, protection and firepower, etc.  While I have no qualms about jumping into a game and playing any nationality, when it comes to a tutorial document such as this I think it’s important I have a firm footing when I start talking about real life doctrine and tactics.  However, the British are probably the closest to US doctrinal thought (which is a rough amalgamation of British and German with a heavy dose of redneck aggression and industrial might thrown in) so I will digress, put on my pips and move out.

The other reason this module appeals to me is it brings to the forefront a very real tactical problem that is missing from the contemporary operating environment but is rampant in CMSF.  That is, of course, the wide spread use of ATGMs by the Syrian conventional AND unconventional forces.  The only army I know of that had to seriously face such a threat was the Israeli Defense Force in Lebanon in the last two decades, particularly in 2006.  And it turned into a political nightmare for them since their answer to the flurry of ATGM that came their way was to light up the countryside with as much firepower as they could bring to bear.  And toward the end they were lighting up the countryside before they started taking ATGM fire, often with detrimental political fallout and very little effect on the enemy.  

It is similar in some respects to the challenge coalition forces have faced in Iraq and Afghanistan re: the IED threat.  A hidden enemy that can attack from hiding with no real clue where he may be until the attack is already initiated.  The ATGM challenge, however, throws in another wrench in that the enemy can be up to 2000 meters away when he initiates the attack.  The Tactics, Techniques, and Procedures (TTPs) developed for the IED threat has changed over time.  Initially everyone just drove as fast as they could down the road, thinking they could throw off the initiator and cause him to set off the bomb either before or after they actually passed over it.  But the enemy adapted and started placing the bombs at choke points or other places where the vehicles were forced to slow or they got really good at marking their triggers in the target area for coalition vehicles traveling at different speeds.

So the TTPs have evolved into what they are today, which is basically drive slow enough to spot anything suspicious in the road and stop to investigate before continuing.  This, coupled with much better intel gathering on IED cells and dedicated route clearance units, has greatly reduced the threat to coalition vehicles.  But it takes a lot of time.  So a drive that might take 30 minutes in the states can turn into hours on the road in Afghanistan.  And that’s if everything else is in your favor and you don’t actually run into any suspected IEDs.
So perhaps together we can start to develop our own set of TTPs for dealing with the ATGM threat in CMSF.  I will start the discussion with this tutorial.

1.  What do I have to do?
Specified Tasks:                1. Movement to contact (route clearance)
                                                2. Seize West Yard (I will call this Objective Jones)
                                                3. Seize Objective Abel
                                                4. Seize Hill Houses (I will call this Objective Smith)
                                                5. Seize Objective Cain
                                                6. Preserve structures on OBJ Cain and Abel

Implied Tasks:                   1. Secure crossing over canal
                                                2. Suppress/destroy likely ATGM locations
                                                3. Protect vehicles from ATGM threat
                                                4. Establish overwatch positions to counter ATGM threat and provide SBF
Purpose: facilitate passage of follow on forces


2.  What do I know about the terrain?

Key terrain


Avenues of approach

                For this analysis the first thing I did was categorize the terrain as “Free Go” (easily traversed by vehicles) and “No Go” (slow or impassable by vehicles, shown in red).  This not only shows terrain unfavorable to mounted movement but also illustrates terrain favorable to dismounts.


Three AOAs are identified.  1 is to the east and hugs the treeline.  2 is to the west and stays in the more open ground of the orchards.  3 breaks from 2 and follows 1 about mid way.  The real challenge is going to be getting across the wadi into OBJ Abel.


LOS

Initial analysis shows that the enemy definitely enjoys some terrain advantages.  For example, seizing OBJ Jones (the West Yard) and then moving laterally across the battlefield to OBJ Abel would expose my units to fire from a number of different positions.  But I also see where I can eliminate each piece of key terrain in sequence without having to worry about fires from all the other pieces of key terrain simultaneously. 


3.  What do I know about the enemy?

Strength/capabilities

Syrian Reserve Infantry Battalion
Three rifle companies pure.  Probably should expect an AT platoon or two with ATGMs and recoilless rifles.

Position


4.  What forces do I have at my disposal?

Recce Platoon – Three Scimitars, Recce Section (2 teams)
2x Sniper Teams
3x Rifle Platoons
1x ENG Platoon
Tank Platoon
Javelin Section
CO HQ, Mtr FSO, FA FSO
Support: 81mm Mtrs, 1 AH-1 CCA, 155mm Batt 

5.  At what point do I begin to win the battle (decisive point)?

                I believe the riskiest part of the operation will be establishing a crossing of the wadi but the point where the battle will turn in my favor is the seizure of OBJ Smith.  It is decisive because once I have seized Smith I will be able to stage an attack on OBJ Cain without a threat to my rear.

6.  How can I most take advantage of the enemy’s weakness?

                I believe I can take advantage the enemy’s dispersal and use the terrain to my favor.  By conducting my attacks from positions that are screened by the terrain from the enemy’s other positions I think I can concentrate combat power against him piecemeal, giving me a local superior advantage.

7.  Can I deceive the enemy to my intentions in any way?

                Due to the screwed up arrival time table and my need to use every asset available to me in each stage of the plan I cannot afford any sort of deception for this mission.

8.  Where do I want to focus my combat power?

                I will focus my available combat power to each stage of the attack, expecting to be able to bring all my assets to bear against OBJ Smith and then OBJ Cain.

9.  What tasks do I need to accomplish?  10.  Which forces can be assigned to accomplish these tasks?

                I will be very tempted to do a lot of waiting in the mission as I try to build combat power.  And I will do that.  As a result I will probably be clearing OBJ Cain as I run out of time.  Hopefully the enemy will surrender or withdraw before I get down to the last minutes.  You will notice I have eliminated OBJ Jones (the West Yard) from my task list.  Intel reports no enemy south of the canal and I see no need to go anywhere near Jones to achieve my mission.

Once again, my task list is completed sequentially:
1.       Establish OP1 to observe OBJ Abel – Recce Section
2.       Scout for hidden enemy positions between OBJ Abel and Smith – AH-1 while I wait for rifle/engineer platoons and tanks.
3.       Establish SBF with tanks near opening in cut to suppress OBJ Abel
4.       If feasible, move up Scimitars to provide additional support to attack on Abel
5.       Seize OBJ Abel – 7 Platoon and Engineers
It is apparent that establishing a foothold in Abel will be a real challenge.  Basically I will have to establish a couple different SBF positions on the southern edge of the wadi (meanwhile trying to minimize their exposure to AT weapons), suppress the buildings on the north side, and then bum rush a platoon across the bridge and into the trees on the south side.  From there I hope to be able to seize the southern buildings through traditional means (suppress, obscure, assault).
6.        Advance along Axis Carp to seize OBJ Adam and Obj Eve – 7 and 8 Platoon


 7.        Establish SBF from OBJ Adams with CSW, Scimitars if feasible – 7 and 8 Platoon, Javelin Sec
8.       Create smoke screen isolating OBJ Cain from OBJ Smith – 155mm Batt
9.       Suppress enemy forces on OBJ Smith with indirect - Mtrs
10.   Advance along Axis Bass and seize OBJ Smith – Tank Platoon and 9 Platoon


11.    Establish SBF at OBJ Eve – 7 and 8 Platoon
12.   Establish SBF at OBJ Smith – Tank Platoon
13.   Advance along Axis Shark and seize OBJ Cain – 9 Platoon and ENG Platoon


Videos of the battle can be viewed here:  http://www.youtube.com/user/tjcmsf